Pick and Placing parts onto a circuit board can be a difficult process, requiring patience, concentration and a limited intake of coffee (to keep your hands steady). Or, you can use Squink and save yourself the time! This tutorial shows you how.
This tutorial only covers Pick-and-place, and not pasting. If you'd like to know more about how you can dispense solder paste or conductive glue, see our other tutorials here.
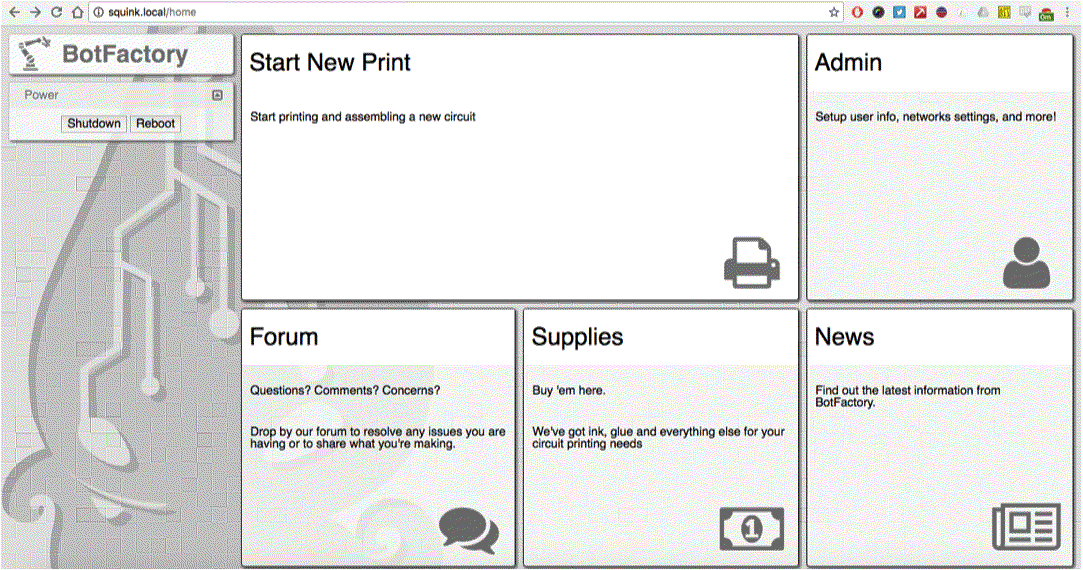
Open Home Page
Turn on Squink and Open up a browser.
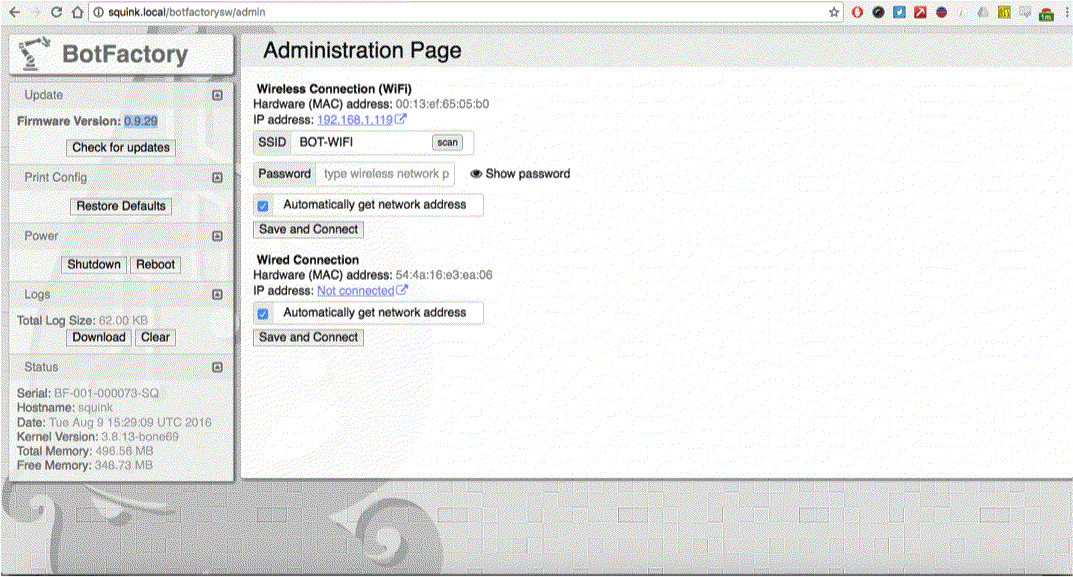
Is your Squink on the right version?
Make sure your Squink is on v.0.9.29 or higher.
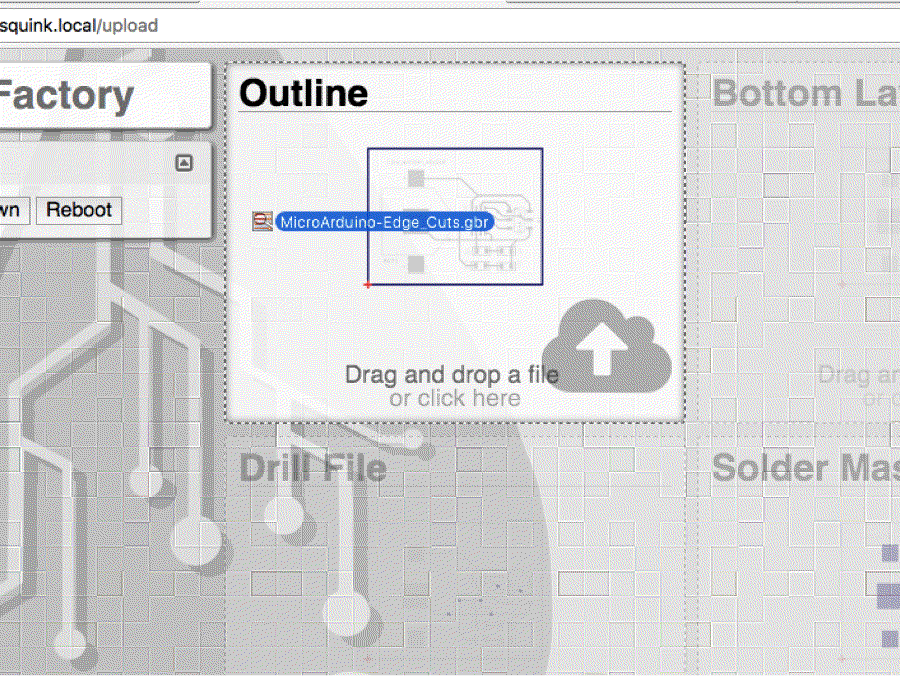
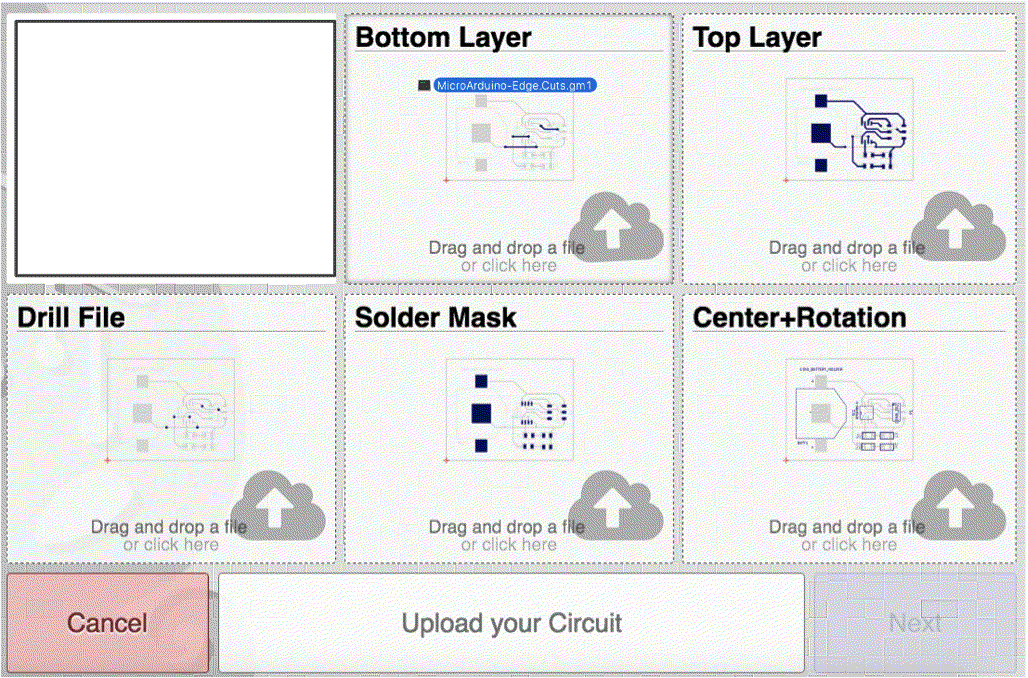
Upload your Outline
This could be a .gto (GERBER) file, an Edge-cut file (KiCAD) or image file (.jpg .png .bmp or .tiff).
NOTE: If you are assembling a board not made with Squink, refer to Appendix A
Upload your Pick-and-Place file
This is a collection of information with components footprints, X/Y coordinates, rotation and comments. Typically this is laid out in a text file, like a .tsv, .csv or .pos and are outputted from your CAD tool.
You don’t need to upload any more information like traces or paste files if you just want to pick-and-place components. See Appendix A at the bottom of this tutorial for more info on assembling non-Squink fabricated circuit boards.
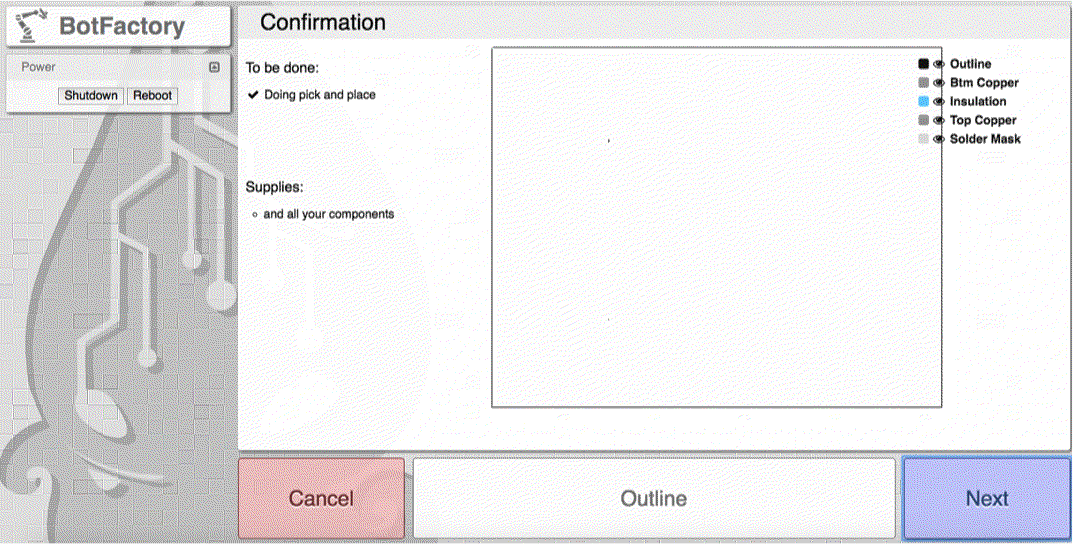
Confirmation Page
This page generally show every file that you’ve uploaded. Unless you upload pad or trace files, nothing besides the ouline will appear here. You need to confirm their sizes of the footprints later on.
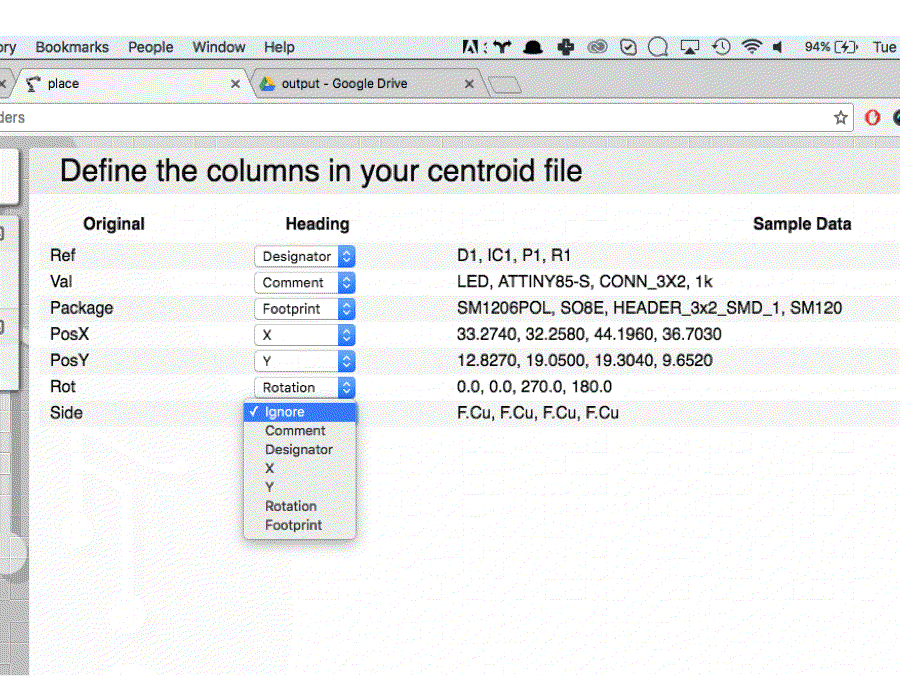
Defining Headers
CAD tools produce different headers in their output files – Squink asks you on this page to confirm that it understands each one correctly.
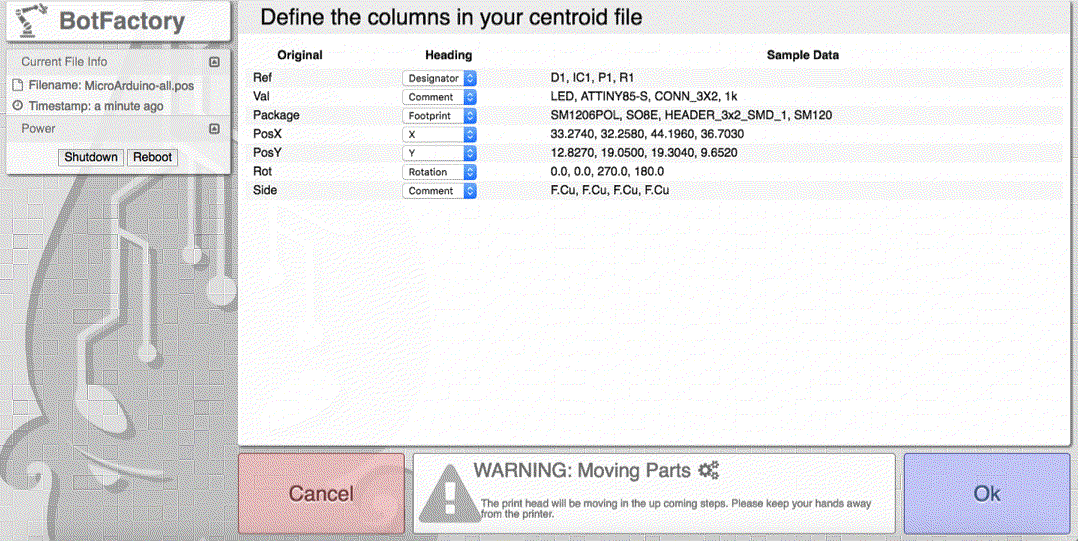
Selecting the Right Header
You can select the right header for each column on your file using the drop-down menu.
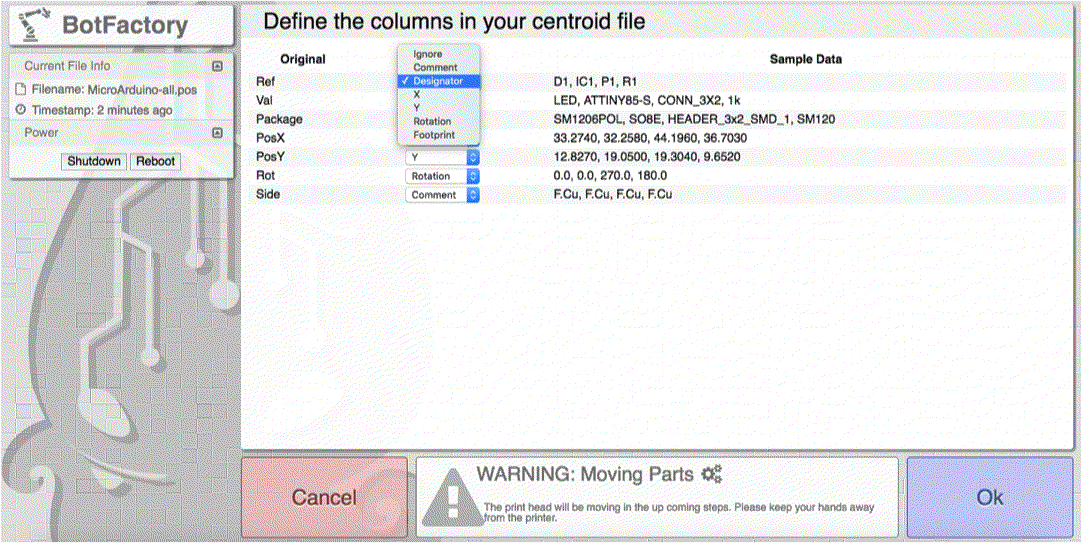
The Importance of Ignorance
You can ignore headers that don’t matter. For example, ‘Sides’ is not applicable for this job. If you’d like to keep this information, you can select ‘Comment’ and it will be included in the Comments column in a later page.
When you’re done, click ‘Next’
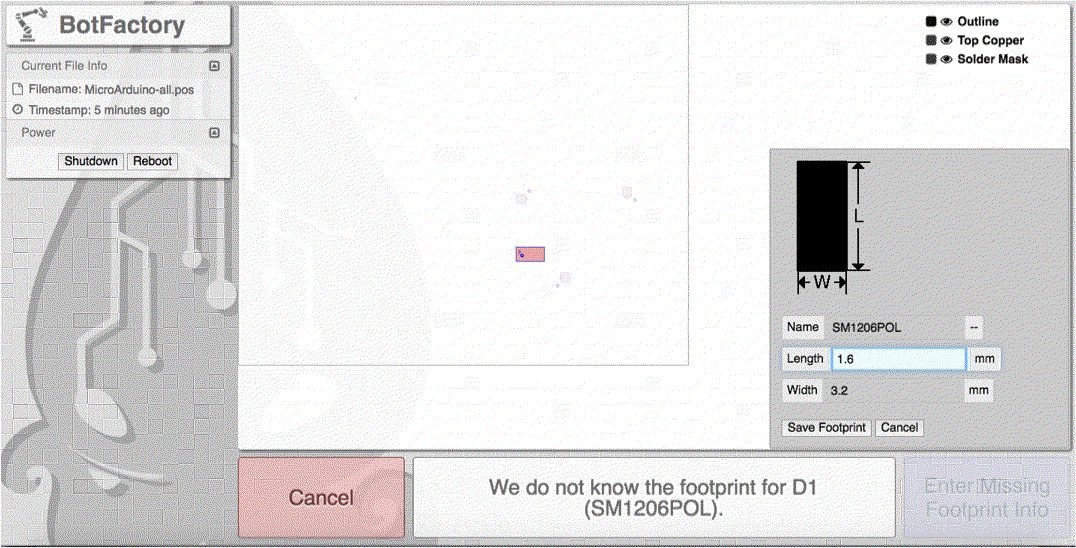
Defining Footprint Size
Sometimes Squink sees Footprint data that it doesn’t understand or has seen before. Unknown part will be shown as red squares. Click on them to input the required information.

Adjust Footprint
You can use the datasheets for each part to make sure that Squink has the right lengths and widths for missing parts.
Squink will ask for the width(W) and length(L) of the part when its rotation is 0 deg. Open your CAD tool and check the alignment of the specific footprint at rotation 0. Then look at the part's datasheet or use a caliper to find W and L. After you click ‘Save Footprint’, it may take a few moments for Squink to reload the page with the new footprint data.
Keep in mind:
- All measurements are in millimeters, not mils or inches.
- Parts need to be placed on the Pick and Place tray with rotation 0.
- Experienced designers verify that their footprints are defined in the same orientation as they come off the reel to simplify the assembly process.
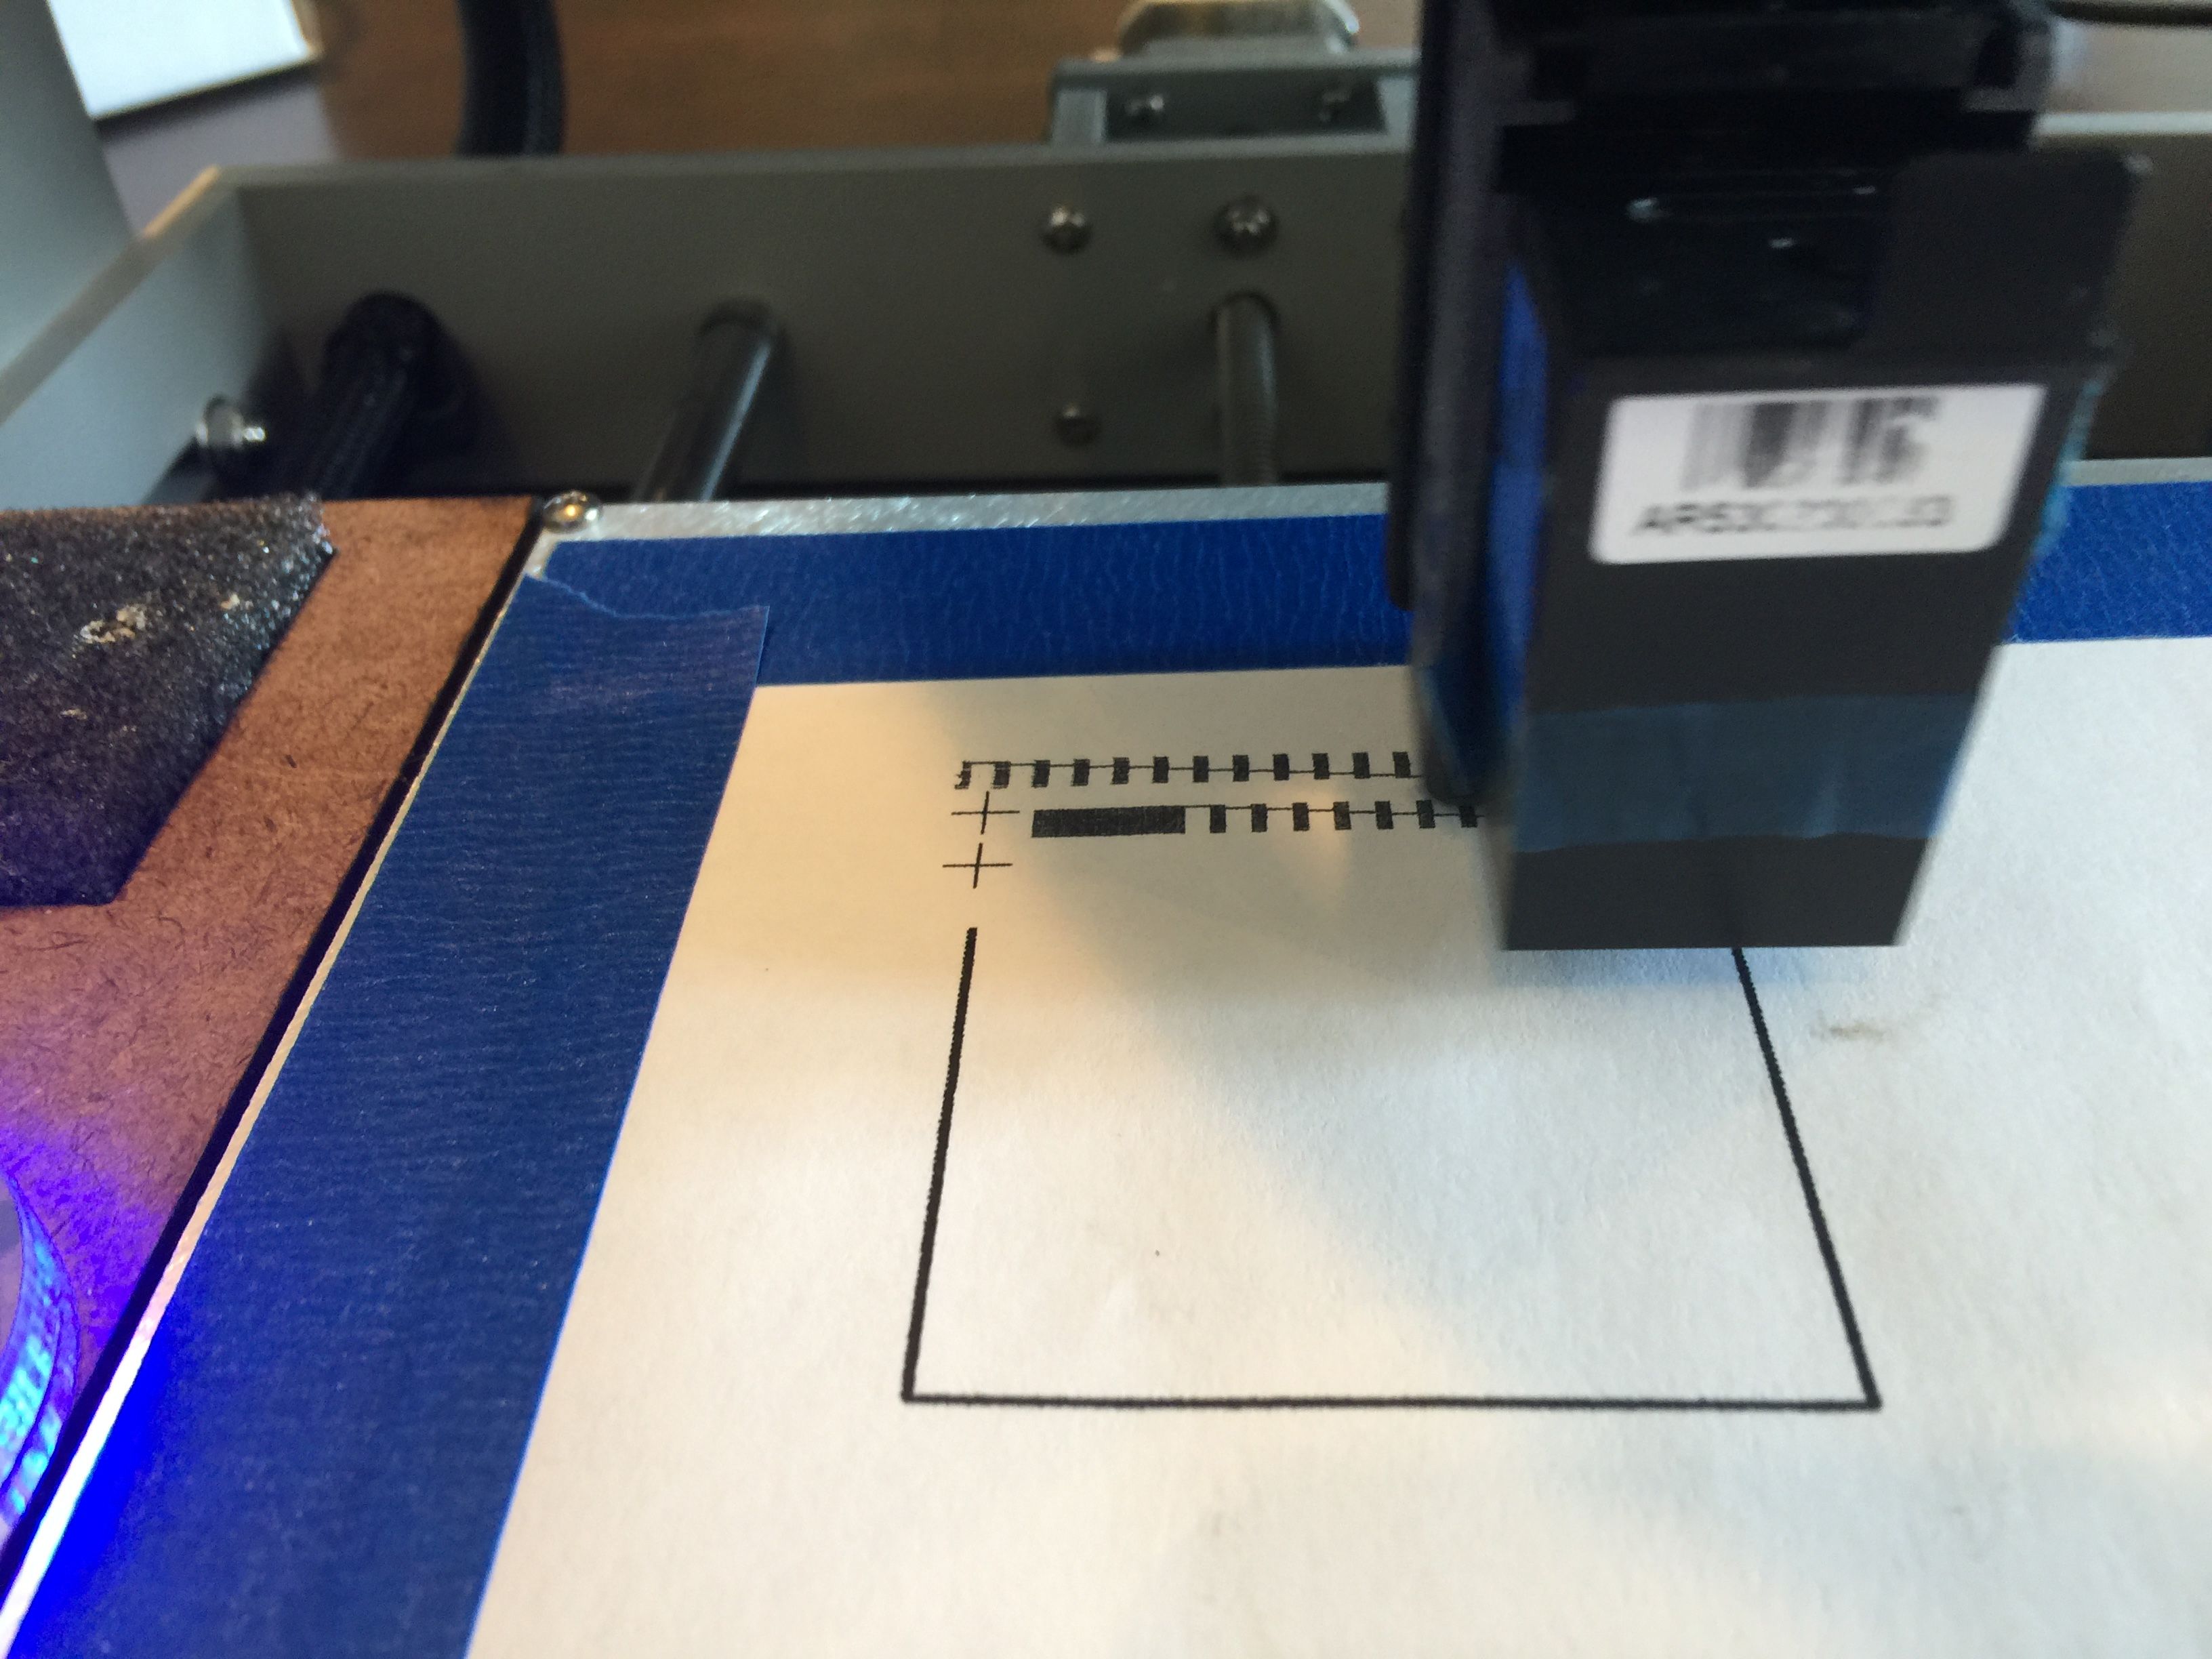
X Marks the Spot
Squink uses an ‘X’ to register the Glue and Pick-and-Place heads. This process is required to align the head to the board.
If you are printing the traces with squink the X mark will be there already. If you are assembling your own board, it is necessary to print out the outline first (See Appendix A)
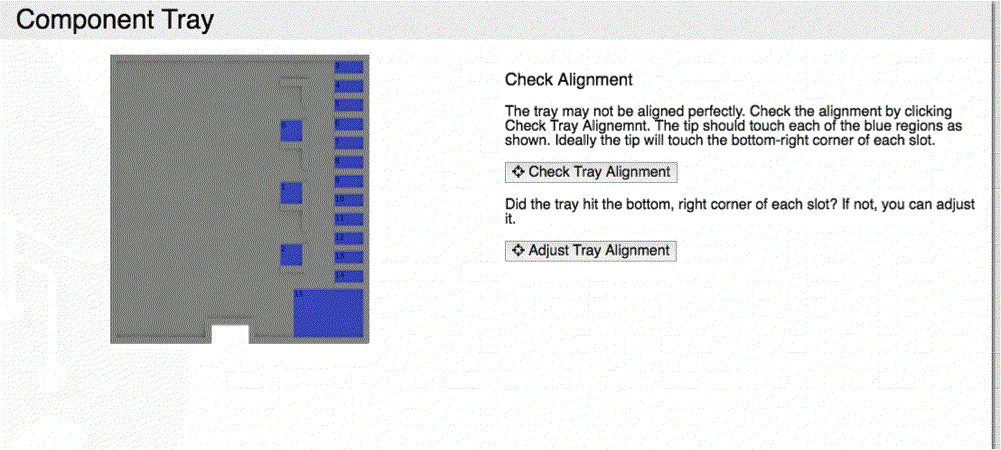
Tray Adjustment
It is important that the tip of the PnP head be aligned with the bottom right corner of the tray, so that the parts can be easily picked up from the slots.
.
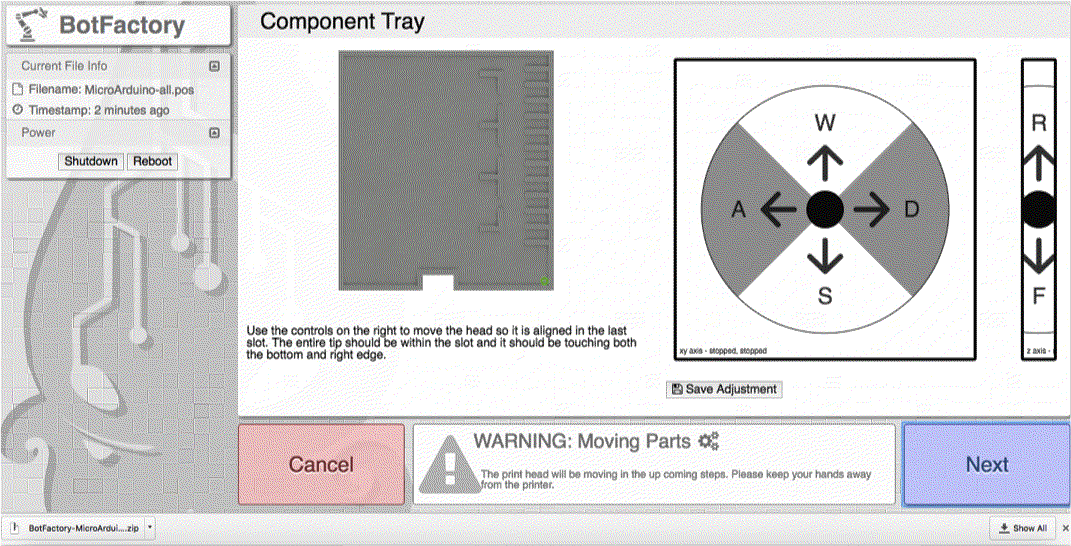
Check your Head Alignment
Calibration isn’t complete without a quick check – Squink makes it easy for you to check each slot and then make any adjustments so you can be sure that the smallest parts will be picked up correctly.
This callibration check is optional and once you get used to the way Squink works you'll find yourself using this feature less often.
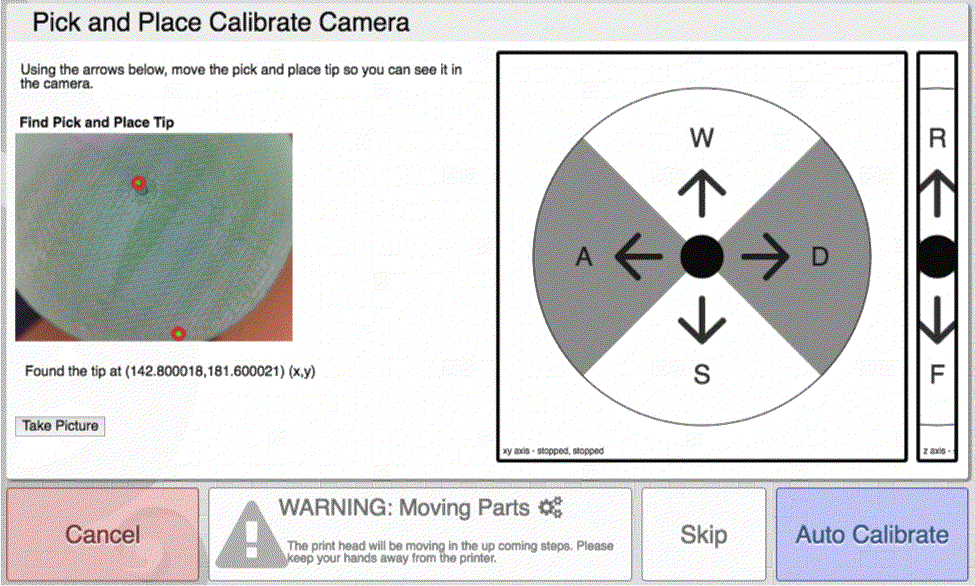
Check PnP Camera
Squink uses image recognition software to find the tip and the outline of each part. It first needs to find the tip, so it has a reference point to compare the outline of the part after it picks it up and makes any adjustments before placement.
On this page use the "camera" icon or the "take picture" button to make sure the tip is close to the center of the picture and then click "Calibrate"
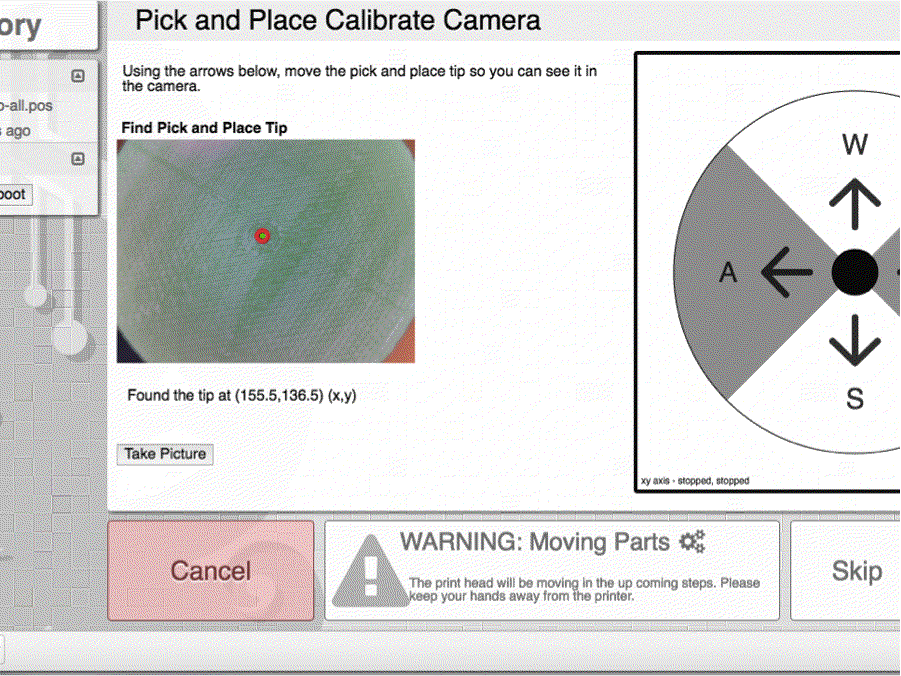
One tip, no more
Your camera may see multiple tips if the real tip isn't centered. Do a few test shots to find the tip, and make sure that the tip is close to the center (along the x/y axis) and in focus (along the z axis).
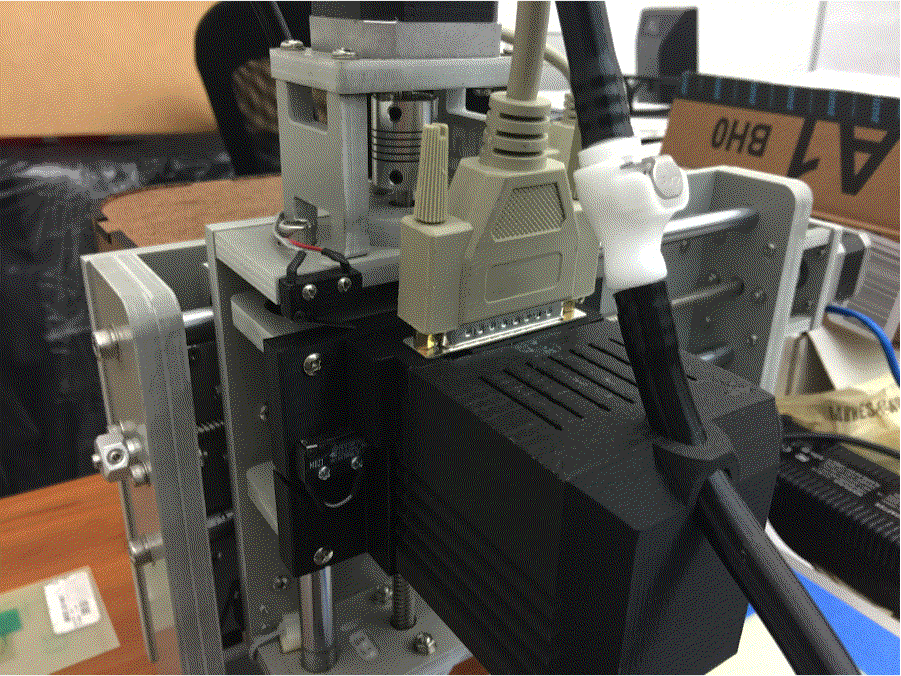
Heads up!
To reach the best camera focal point for the tip, the entire PnP toolhead should raised to be just below the top end-switch, as illustrated above.
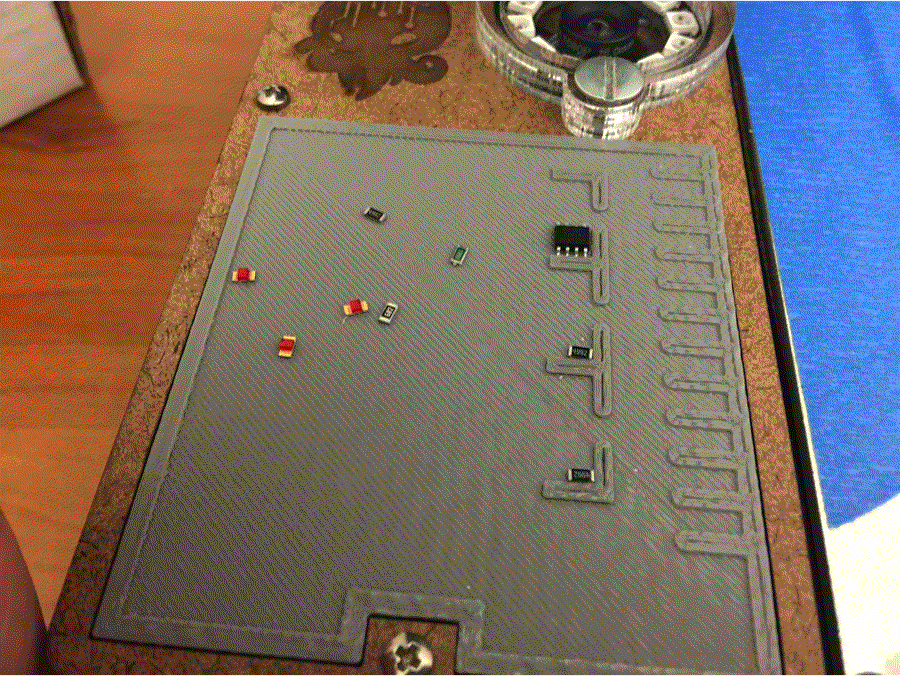
Fill the Tray
Typically we use the left-hand area as a ‘holding area’ for the parts, and the right hand areas for actual pick-and-placing. Squink uses the same rules as tape and reel SMT packaging, so the designs done for an industrial design Pick-and-Place machine apply for Squink as well.
The parts should be placed as if it was in a 0 degree rotation taking the rail as reference.Often times this means that pin 1 is oriented towards the bottom left.
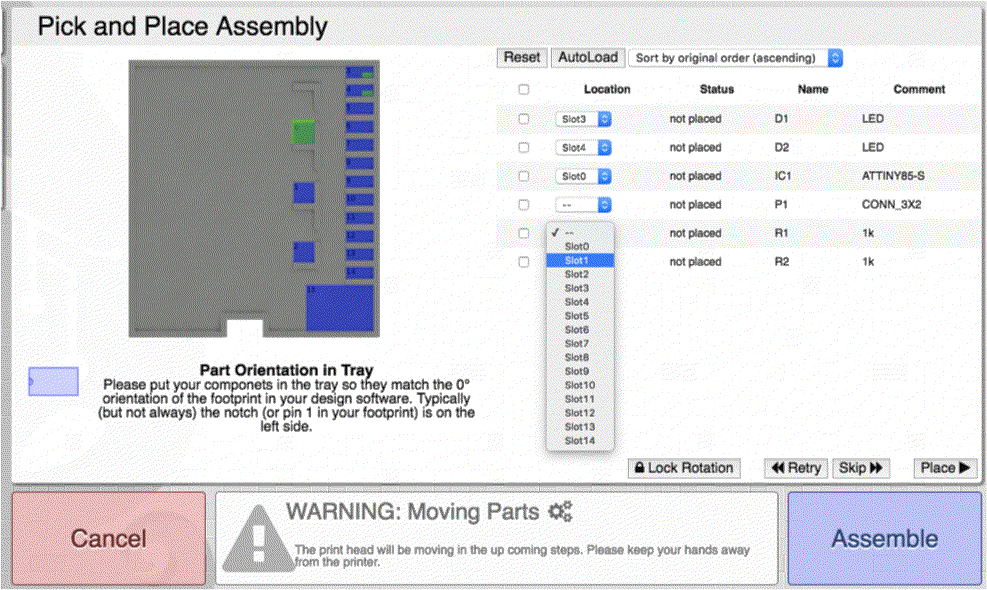
Assigning Slots to Parts
Use the drop-down menu on each part to assign it the slot that you’d like to place it in. Slot 0,1 and 2 are ideal for big parts – the rest are for smaller, 1206-sized parts.
You can also select multiple parts and click "Autoload" to have Squink automatically asign a Slot.
Don't forget you can use different sorting. This is usefull if you want to place components in groups of the same type or same size.
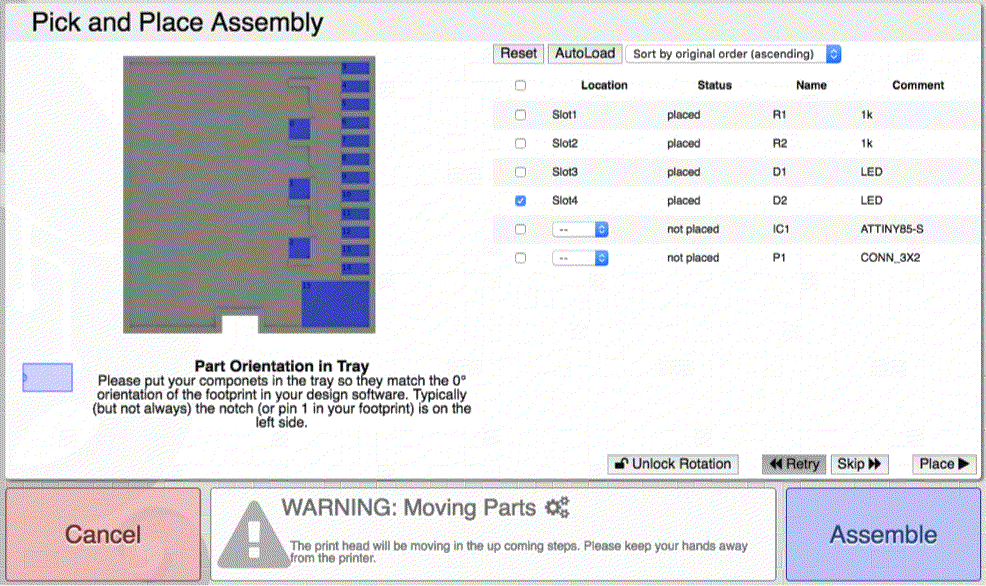
Retrying Placement
If a part fails to place for whatever reason, click the box and hit ‘Retry’ just above the blue Assemble button.
If parts are not being picked up right, you may need to realign the tip to tray. As of 0.9.29, you will need to restart the process (although all of the footprint data previously inputed has been saved).
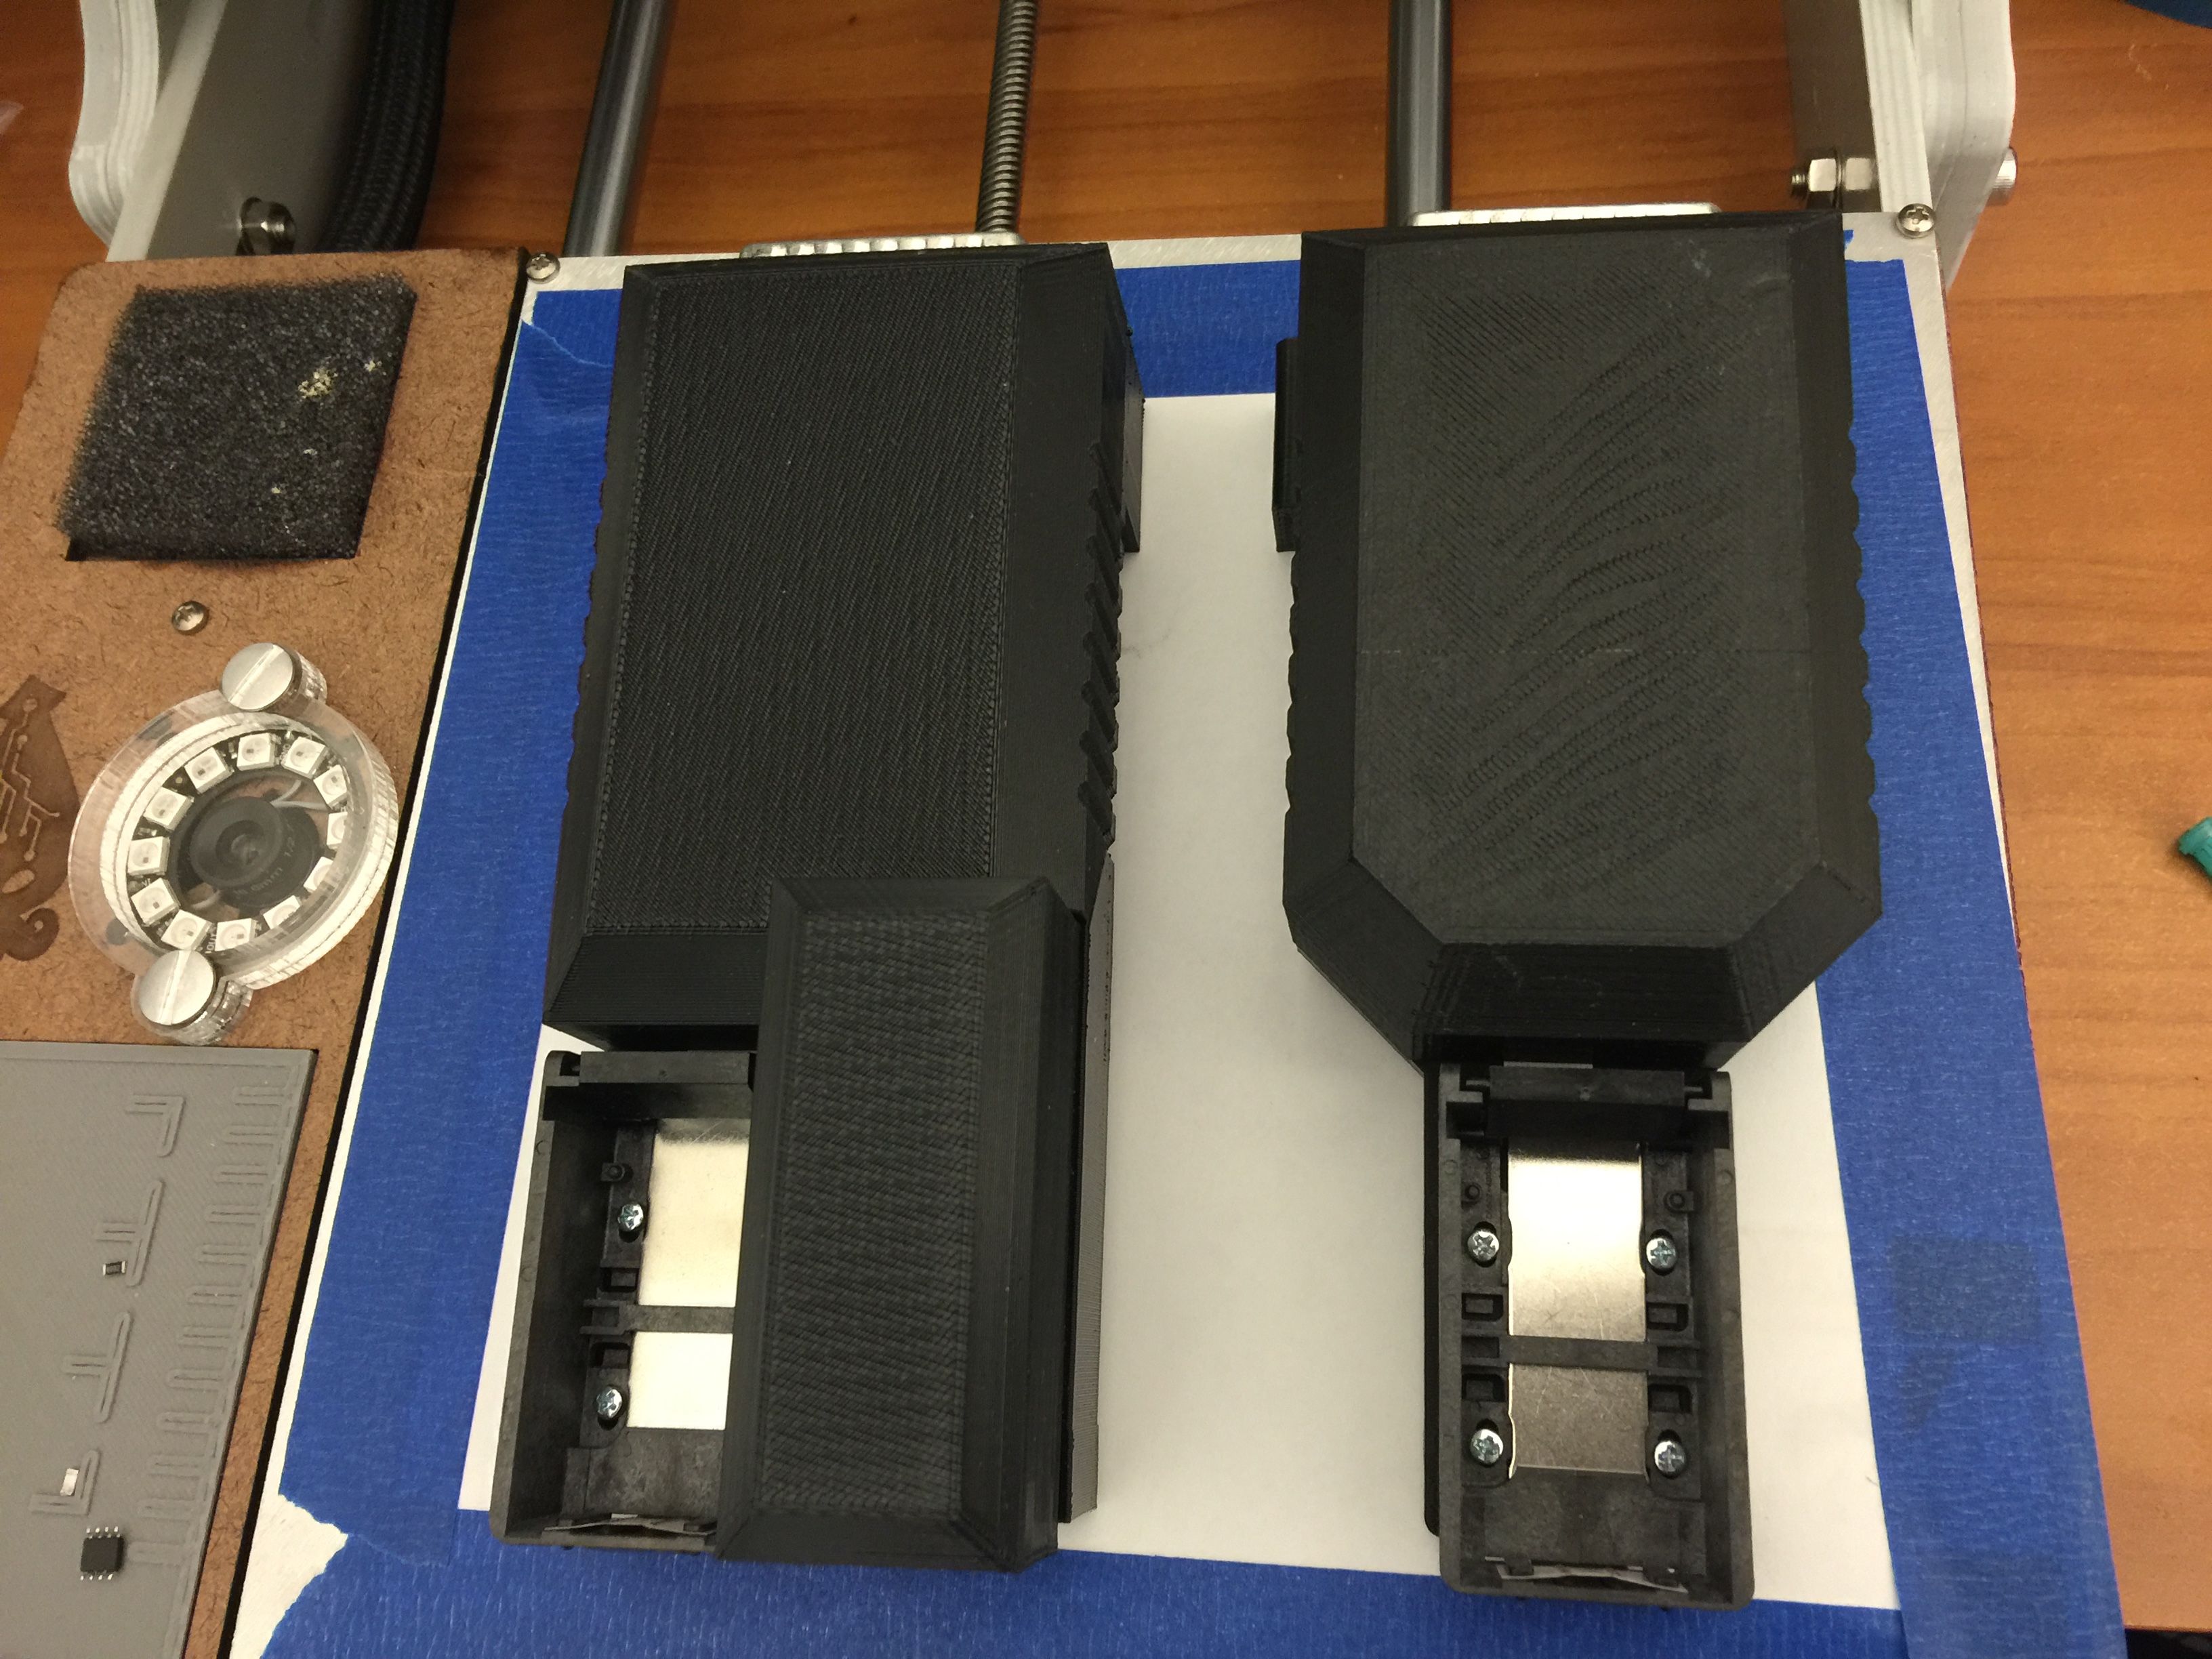
Suction Cups for Larger Parts
For larger parts, it’s important that you use the suction tips included in your Squink Consumeable and Toolhead Box. Otherwise, your parts will not be placed as precisely as possible.

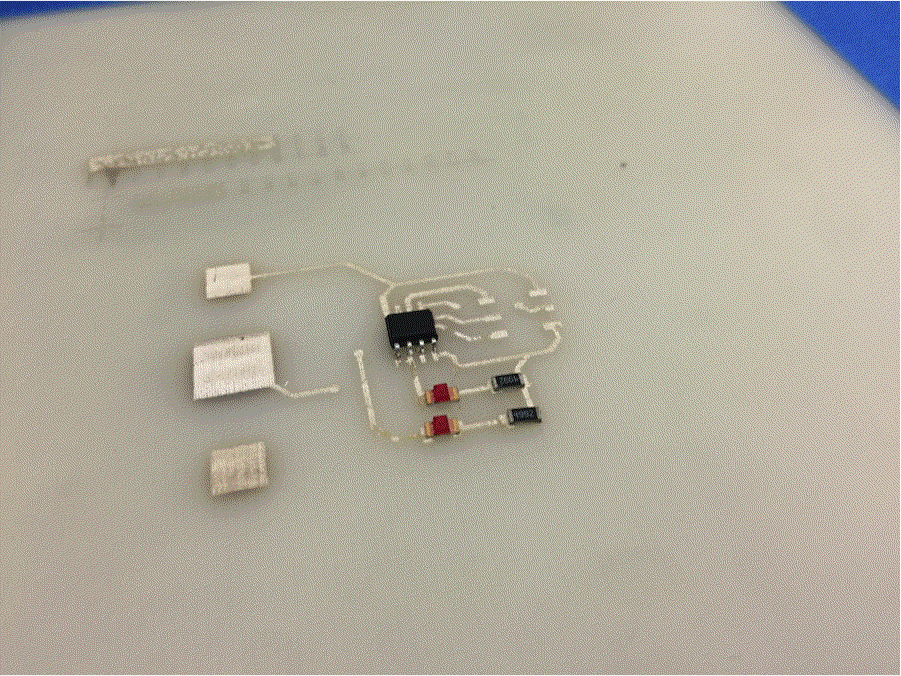
Done!
Have any trouble or questions? Contact us at support@botfactory.co or check out our forum at http://www.botfactory.co/forum
Appendix A
Using Squink to Build pre-made Circuit Boards
Using Squink for assembling pre-made PCBs is a great way to save time and money. We use Squink to assemble the very PCBs that power each machine!
In order to do this, you need to go thru the process of printing an outline of your PCB onto a sheet of paper, and registering the board to the outline.
What you will need to get started is
-a Squink Basic Printer or Squink Multilayer PCB Printer
-Paper and tape
-Black, Standard or Advanced Ink
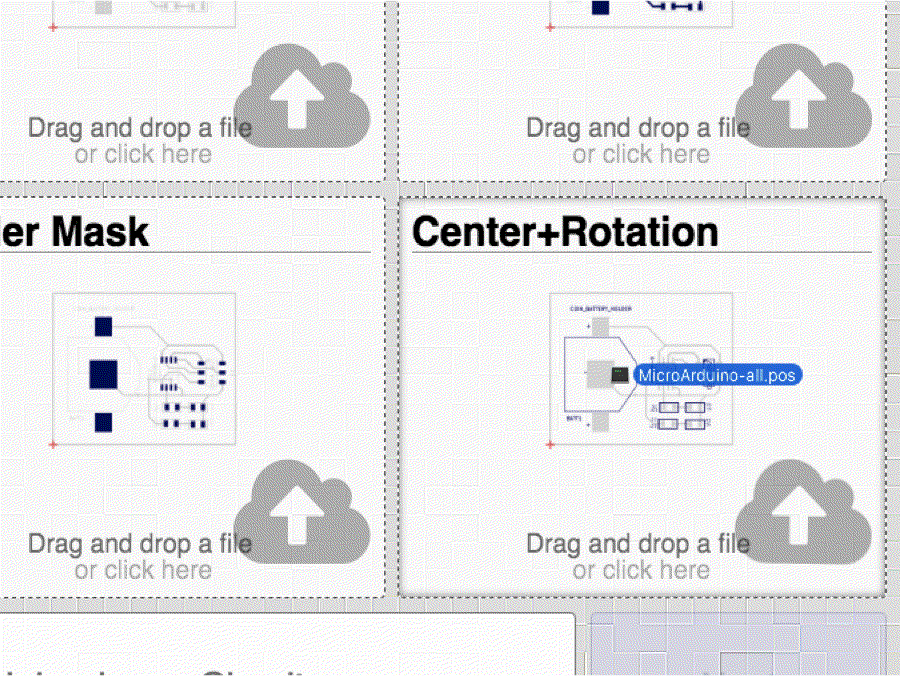
-Outline and Center/Rotation Files
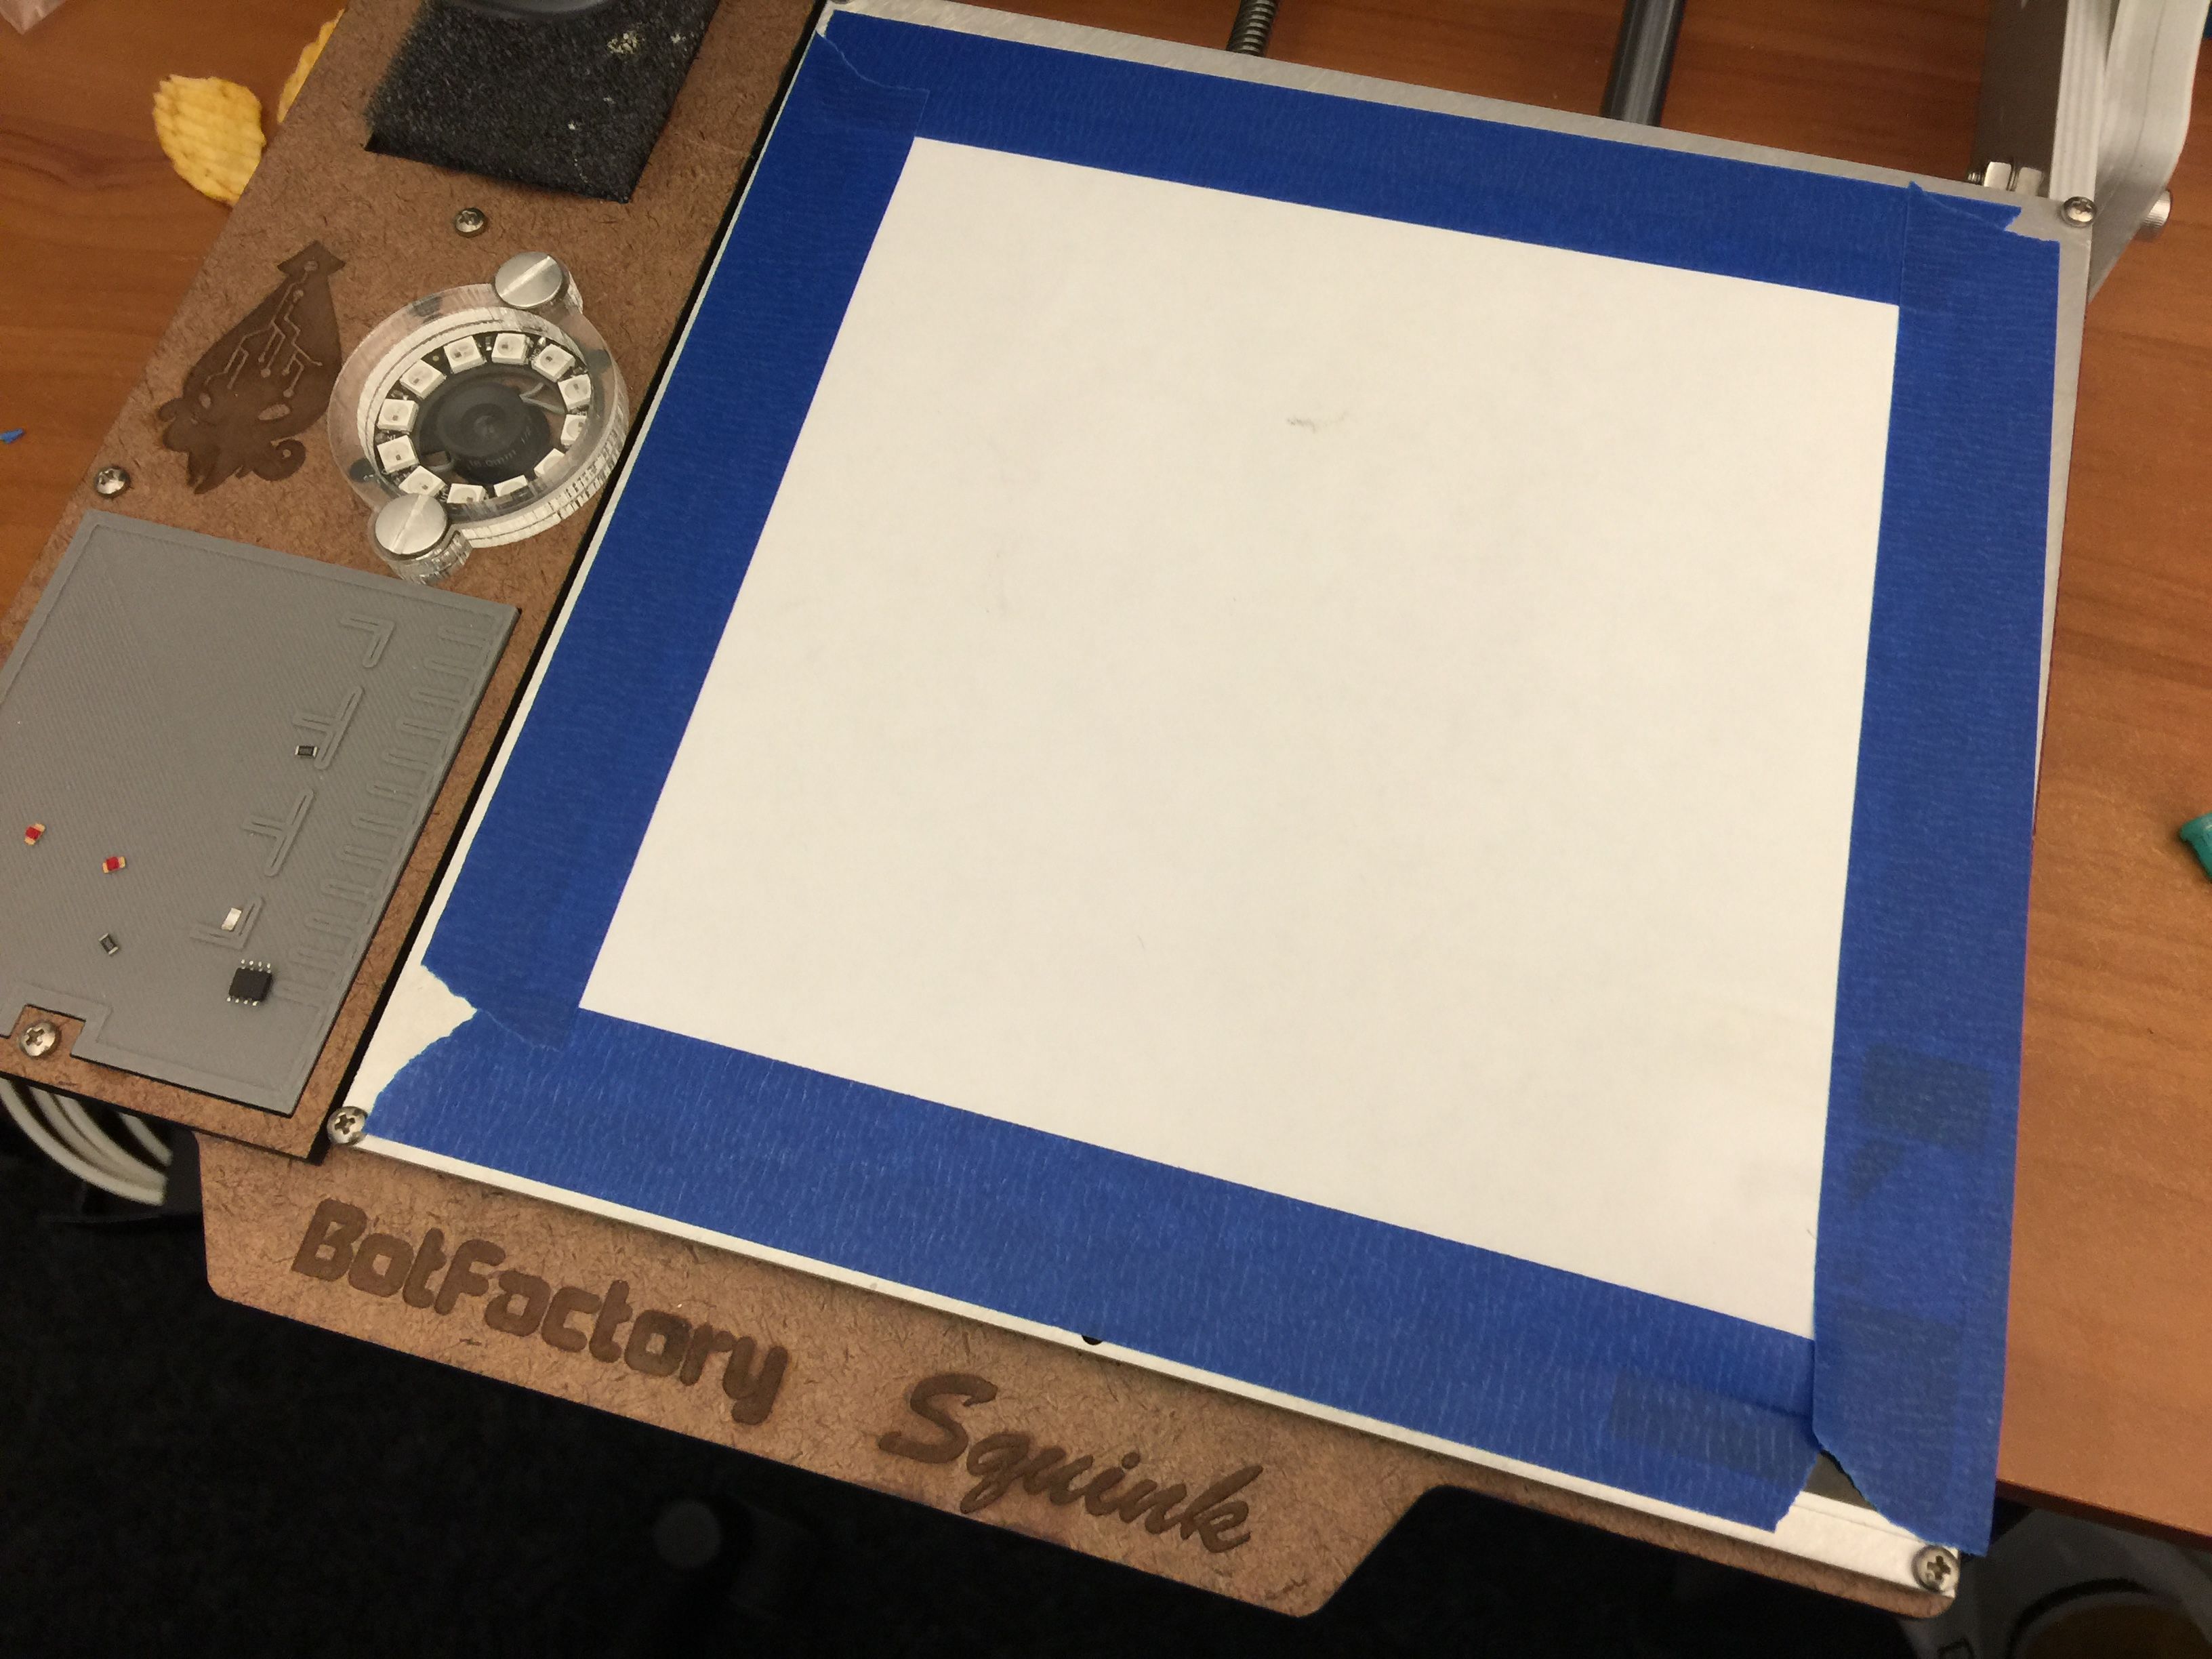
Place Paper
We are going to first print the outline onto paper, saving substrates for serious trace printing later.
Print an Outline
Regardless of whether you have a Basic PCB Printhead or our Multilayer Printhead, you need to print the outline. You can print it using Black Ink, Standard or Advanced ink. This allows you to Pick-and-place within a 5"x6" either head.
Upload Outline Twice
In order to print the outline, you need to upload the outline file (ie a .jpg or .gto) of the design you wish to assemble to the Outline and Botton Layer sections. After that, upload the Center and Rotation file to the proper section.
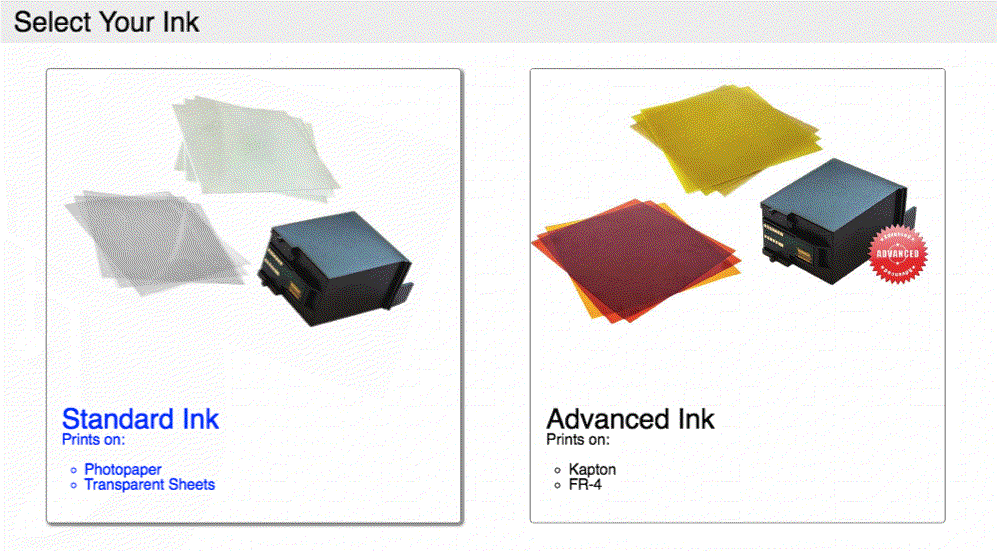
Choose Ink
For printing with Black Ink or Standard Ink choose the Standard Ink option. We recommend using Black or Standard Ink as they do not require the heatbed, where as Advanced Ink requires it and slows down the printing process. Not to mention that Black Ink is relatively inexpensive.
Print Outline
Squink will take you thru the printing process. Don't forget to test the nozzles and clean the cartridge. Black Ink is very easy to print with - only one pass is required!
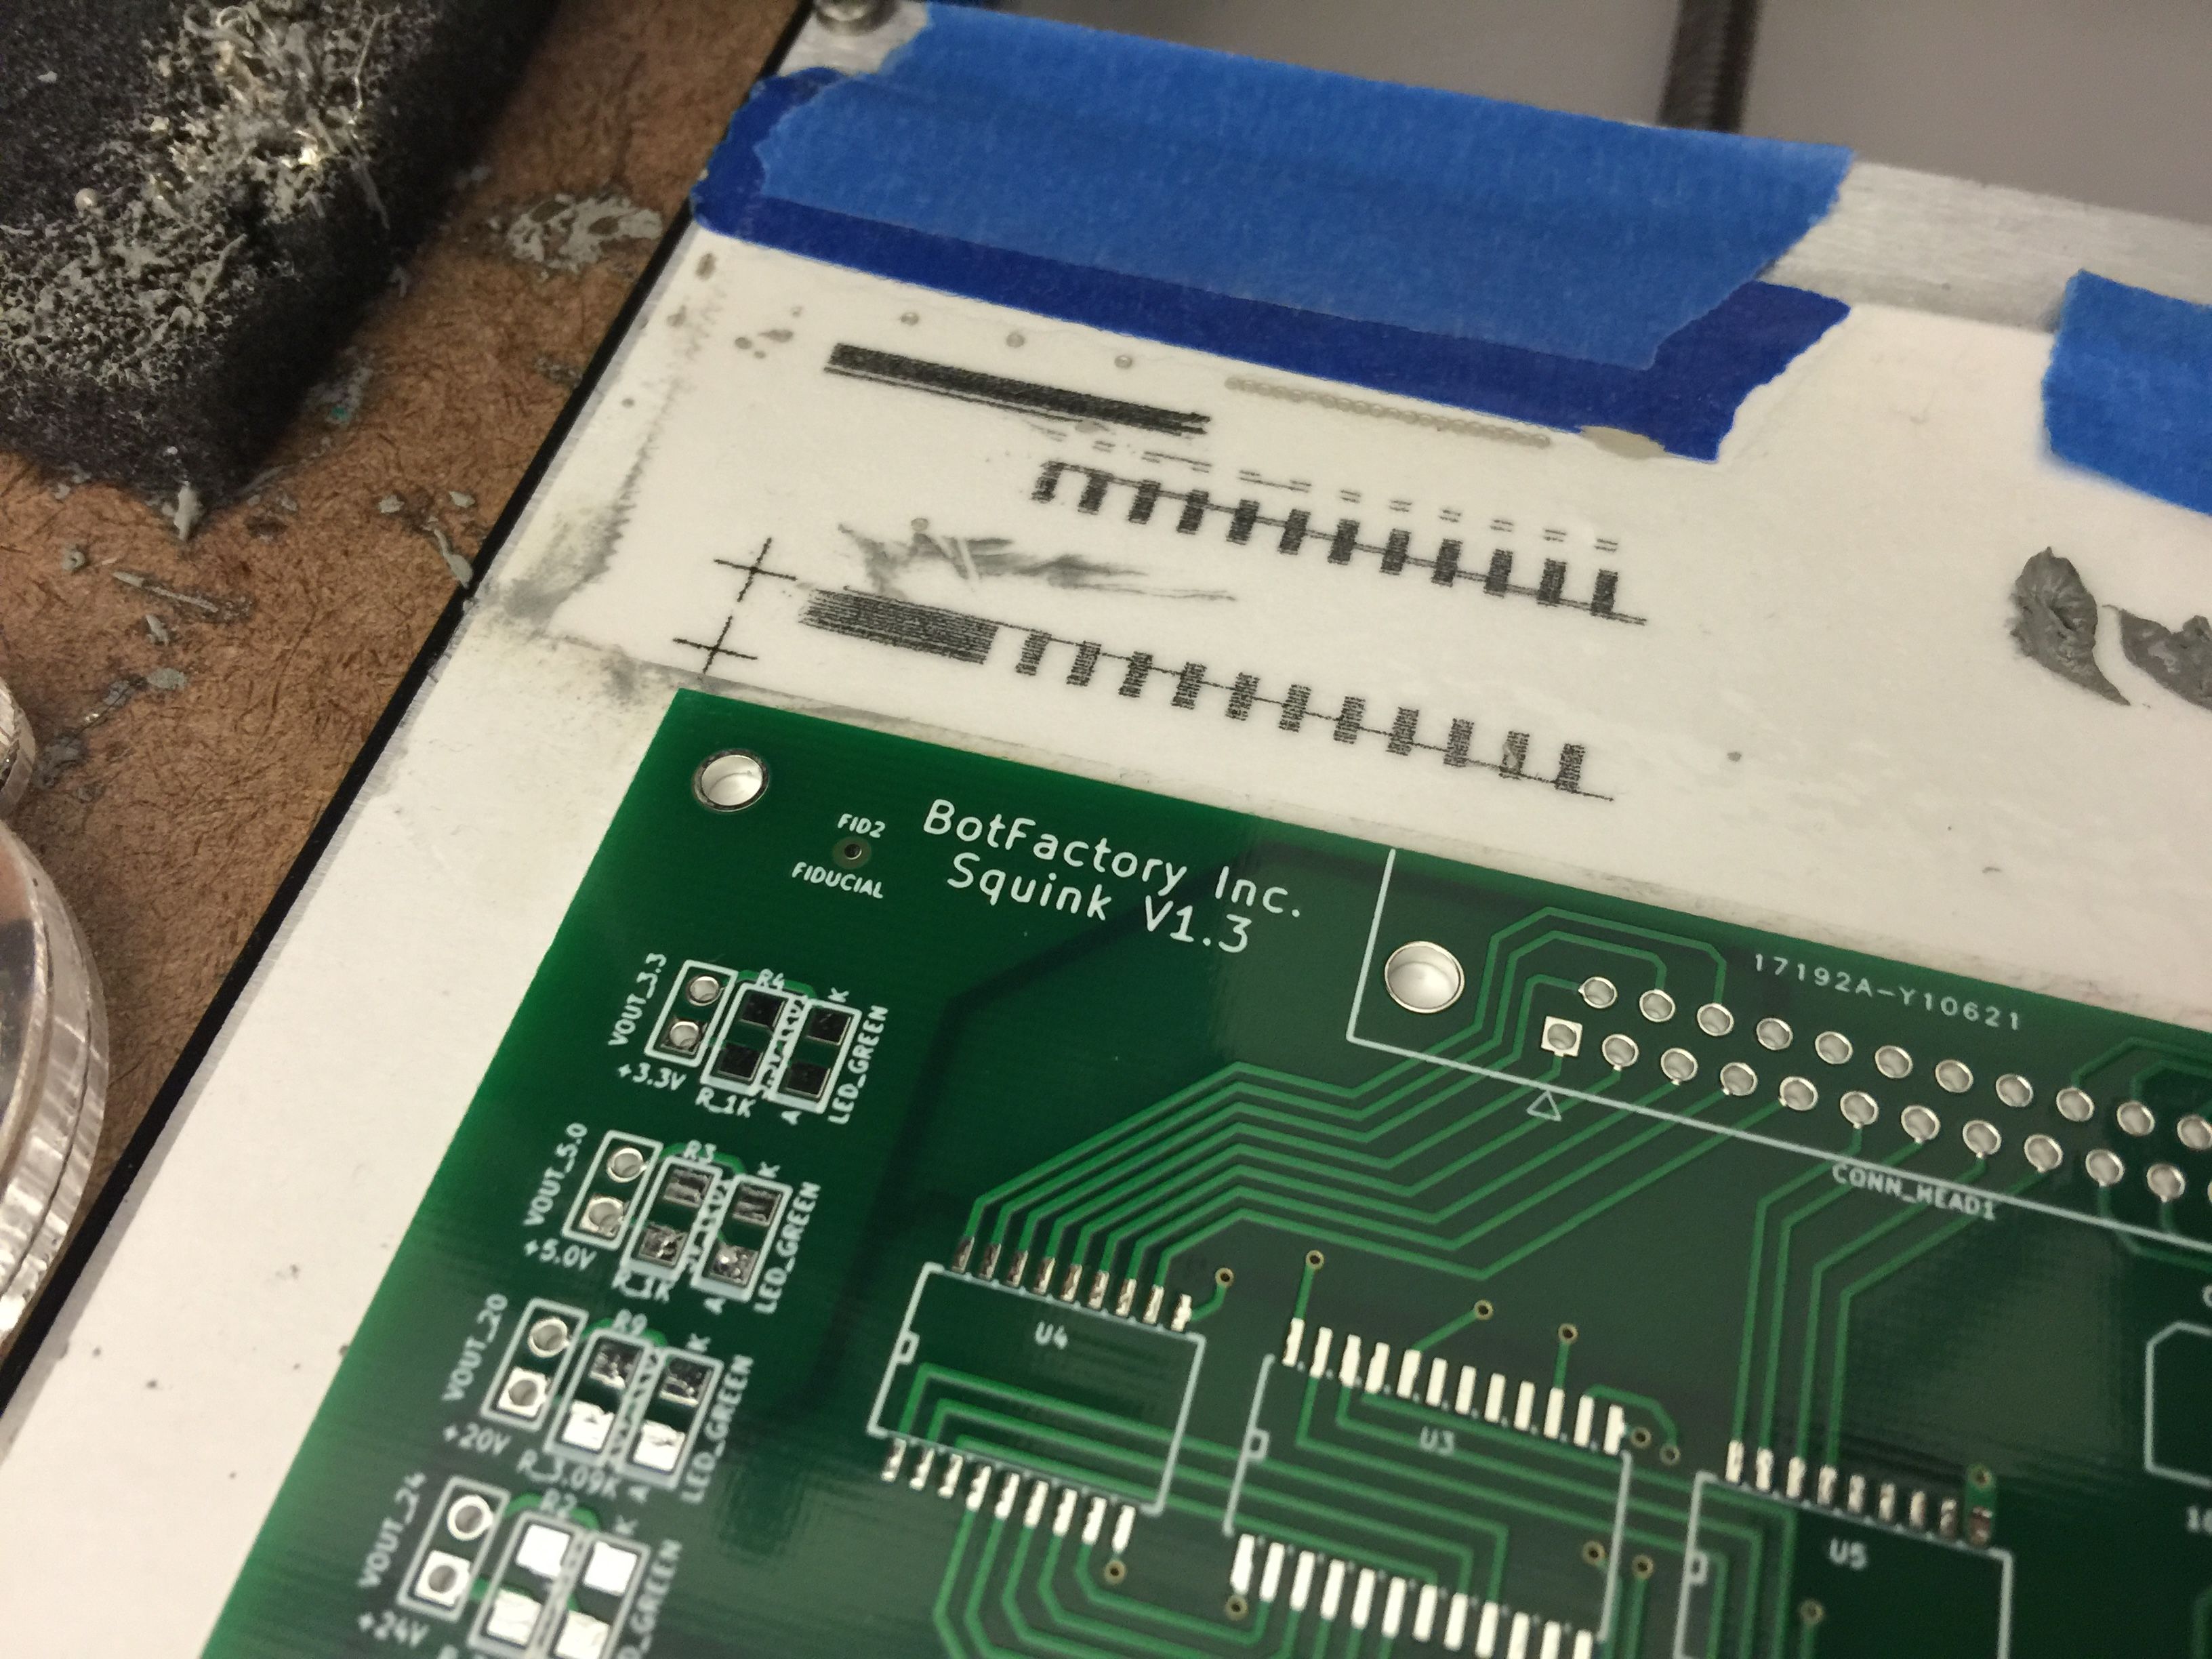
Place and Register Board to Outline
Align your board to the printed outline and affix it.
Since Squink has printed the two crosshairs with the Outline, you have a way to register the Gluehead and PnP head to the board too!
If you've uploaded the Center and Rotation files already, Squink will take you to the next step to Pick-and-place parts, so refer to the rest of the Tutorial above to complete assembly.